Hosted Solution
In the hosted solution, beneficiaries interact directly with the i-payout platform. i-payout handles most of the account management with the eWallet interface, offering limited customization confined to the platform's functionalities. The integration effort is low, mainly involving API calls to create accounts and process payouts. Here are the key steps involved in this integration:
- Authentication: Obtain an API token by validating your credentials.
- Beneficiary Management: Create and manage beneficiary's accounts using API calls.
- Make Payouts: Use the API to send funds to your beneficiaries' eWallets.
eWalletAfter setting up the beneficiary account, it is the beneficiary's responsibility to access the eWallet, complete the KYC process, and withdraw their funds using the various methods offered by i-payout. Refer to the Beneficiary Account Creation page to learn how the eWallet process works.
Below, you will go through the necessary API calls to integrate with the Hosted Solution.
Step 1: API Token
To start using i-payout solutions, you will need to authenticate with your API Token. Refer to the Get a Token guide to learn how to:
Step 2: Create a Beneficiary
A beneficiary is an individual designated to receive funds or payments through the i-payout system. To create a beneficiary, you will need to provide detailed information about the individual, such as their name, address, and payment details.
Use the Create Beneficiary endpoint to create a new beneficiary. The request should include all necessary details about the beneficiary in the request body and, as shown in Step 1, include the authentication to access the i-payout API. Below, you will find an example request to create a new beneficiary:
curl --request POST \
     --url "https://merchantapi.testewallet.com/api/v1/beneficiaries" \
     --header 'Authorization: Bearer <YOUR_API_TOKEN>' \
     --header 'X-MerchantId: <YOUR_MERCHANT_ID>' \
     --header 'accept: application/json' \
     --header 'content-type: application/*+json' \
     --data '{
        "username": "john_doe",
        "firstName": "John",
        "lastName": "Doe",
        "email": "[email protected]"
    }'
{
"data": {
"customerToken": "e0e4764b-9619-4deb-95c4-108ce9f0fe04"
},
"isSuccess": true,
"message": "Customer created successfully",
"statusCode": 0,
"logIdentifier": "497b73624c0d47bfb0abf58df5dd99ca"
},Step 3: Make Payouts
With the new beneficiaries created in the system, you can now pay them. This is done by making payouts to their eWallets, and the eWallet will allow them to choose how to withdraw their money. Payouts can be created through both the Make Payouts and the Special Case endpoints.
Make Payouts
The Make Payouts endpoint allows you to create multiple payouts in a single request. The system treats this request as an atomic transaction, which means that if one record fails, all payouts will fail to load, requiring you to fix the fail reason and retry to create all records. Below, you will find an example request to make payouts:
curl --request POST \
     --url "https://merchantapi.testewallet.com/api/v1/payouts" \
     --header "Authorization: Bearer <YOUR_API_TOKEN>" \
     --header "Content-Type: application/json" \
     --header "X-MerchantId: <YOUR_MERCHANT_ID>" \
     --data '{
         "partnerBatchId": "batch_001",
         "poolId": "pool_123",
         "allowDuplicates": true,
         "autoLoad": true,
         "currencyCode": "USD",
         "arrAccounts": [
             {
                 "username": "john_doe",
                 "amount": 200,
                 "merchantReferenceId": "789012"
             },
             {
                 "username": "jane_smith",
                 "amount": 150,
                 "merchantReferenceId": "345678"
             }
         ]
     }'
{
"isSuccess": true,
"message": "Payout created successfully",
"statusCode": 200,
"logIdentifier": "log_abc123def456",
"data": {
"batchId": "batch_001"
}
}Make Payouts Special Case
The Make Payouts Special Case endpoint allows you to create multiple payouts in a single request. However, unlike the previous request, this one is not an atomic request and will treat each payout individually. This means only the failed payout won't be created, and all others will be generated normally. Below, you will find an example request to make payouts:
curl --request POST \
     --url "https://merchantapi.testewallet.com/api/v1/payouts/special-cases" \
     --header "Authorization: Bearer <YOUR_API_TOKEN>" \
     --header "Content-Type: application/json" \
     --header "X-MerchantId: <YOUR_MERCHANT_ID>" \
     --data '{
         "partnerBatchId": "batch_001",
         "poolId": "pool_123",
         "allowDuplicates": true,
         "autoLoad": true,
         "currencyCode": "USD",
         "arrAccounts": [
             {
                 "username": "john_doe",
                 "amount": 200,
                 "merchantReferenceId": "789012"
             },
             {
                 "username": "jane_smith",
                 "amount": 150,
                 "merchantReferenceId": "345678"
             }
         ]
     }'
{
"isSuccess": true,
"message": "Payout created successfully",
"statusCode": 200,
"logIdentifier": "log_abc123def456",
"data": {
"batchId": "batch_001"
}
}Step 4: Approving Payouts
Payouts must be approved before they can be loaded into your beneficiaries' eWallets. You can perform this through the API or within the Admin Portal.
API
To approve payouts with an API call, you need to set the autoLoad key as true in the requests created in Step 3. This will automatically approve and load payout into eWallets. A batch will be automatically closed, and no other loads can be added to this batch.
Contact i-payout supportTo be able to use the autoLoad feature directly through the API, i-payout need to set the limits on our side. Get in contact with our support to request this to be set.
Admin Portal
In the Admin Portal, you can approve or decline the payout requests that have been created. To do this, follow the steps below:
- Navigate to the Admin Portal.
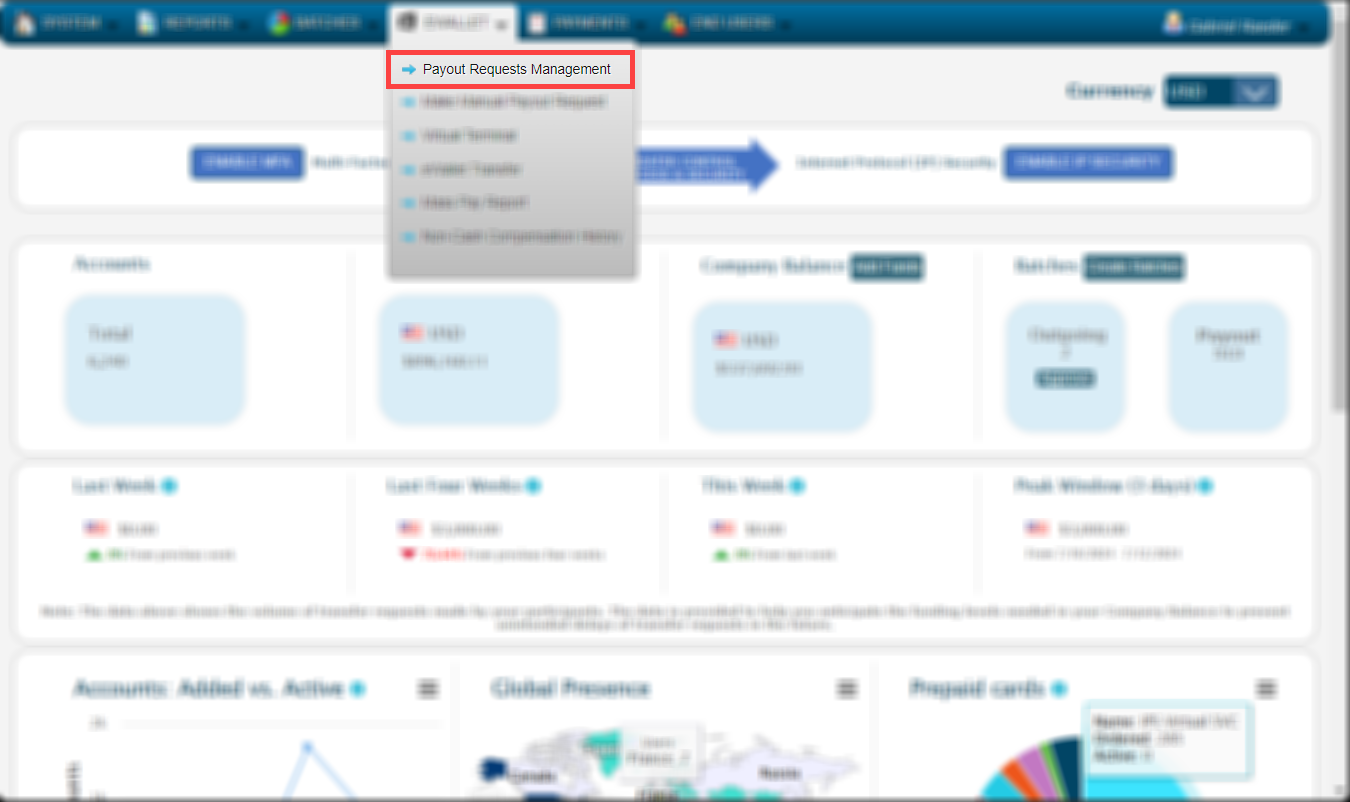
- On the Navigation bar, go to eWallet > Payout Requests Management. As presented in the image below:

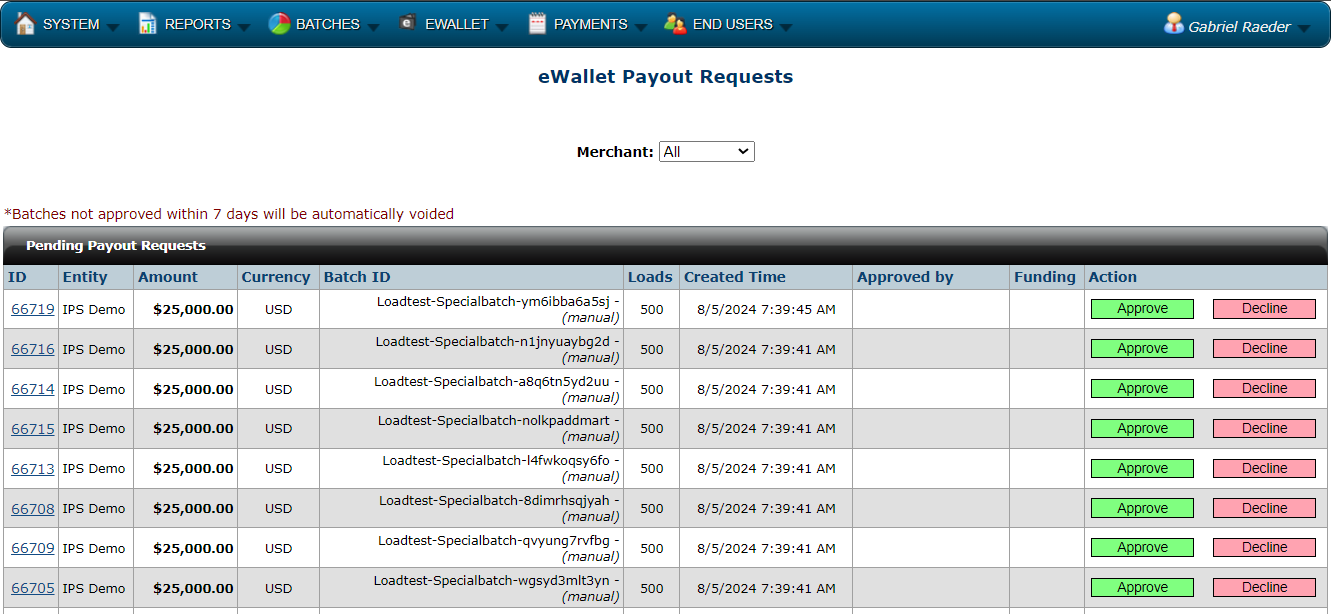
- Once you reach the eWallet Payout Requests, you'll be presented with two tables, one with payout requests needing approval and a second, at the bottom, with a history of all requests. The image below presents the first table, which exemplifies where you find the approve and decline buttons for each request.

Webhooks
Set up webhooks to receive real-time notifications about various events related to i-payout. By configuring webhooks, you can automate your workflow, reduce manual checks, and immediately inform you of important events. Learn more about i-payout Webhooks here.
Updated 5 months ago